


How Do You Adjust the Length of a Trekking Pole?
Adjusting the length of a trekking pole is a straightforward process, and it allows you to customize the pole to your height and the terrain you’re hiking on. Most modern trekking poles are designed with adjustable mechanisms that make length adjustment easy. Here’s a step-by-step guide on how to adjust the length of a typical trekking pole:
Step 1: Gather Your Equipment
Before you begin, make sure you have your trekking pole and are wearing the appropriate hiking footwear and gear.
Step 2: Locate the Adjustment Mechanism
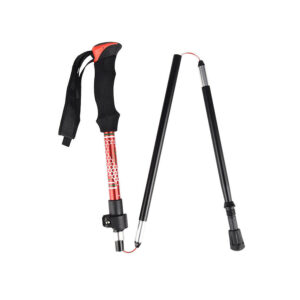
Most trekking poles have an adjustable section near the top of the pole, typically composed of two or three segments with locking mechanisms. The most common types of locking mechanisms are twist locks and lever locks.
Twist Lock: These locks require you to twist the pole’s sections in opposite directions to secure them in place.
Lever Lock: Lever locks feature a small lever that you flip open, adjust the length, and then flip closed to secure the sections.
Identify the type of locking mechanism on your trekking pole.
Step 3: Adjust the Length
Twist Lock: If your pole has twist locks, follow these steps:
Loosen the twist lock by rotating the lower pole section counterclockwise while holding the upper section steady.
Adjust the length to your desired height by extending or retracting the lower section.
Once you’ve set the desired length, tighten the twist lock by rotating the lower section clockwise until it’s snug. Don’t over-tighten, as this can damage the lock.
Lever Lock: If your pole has lever locks, follow these steps:
Open the lever by flipping it open or pulling it outward, depending on the design.
Adjust the length by extending or retracting the lower section.
Close the lever by pushing it back into its locked position. Ensure it clicks securely in place.
Step 4: Check for Proper Adjustment
After adjusting the length, perform a quick check to ensure the pole is securely locked in place. Gently tug on the pole to make sure it doesn’t slide or collapse. If the pole’s length shifts, readjust and lock it more securely.
Step 5: Repeat for Other Poles
If you’re using a pair of trekking poles, repeat the adjustment process for the other pole, ensuring both are set to the same length.
Step 6: Test the Length
Take a few steps with the trekking poles to ensure they feel comfortable and suit your height and the terrain you’re hiking on. You can always readjust them if needed during your hike.
Remember that the ideal length for your trekking poles may vary based on personal preference and terrain. For general hiking, a good starting point is to adjust the poles so that your elbows are at approximately a 90-degree angle when you hold the grips while standing on flat ground. However, you may need to adjust them longer for downhill sections and shorter for uphill sections. Experiment with different lengths to find what works best for you.
Comments